This post may contain affiliate links. Please read our disclosure policy.

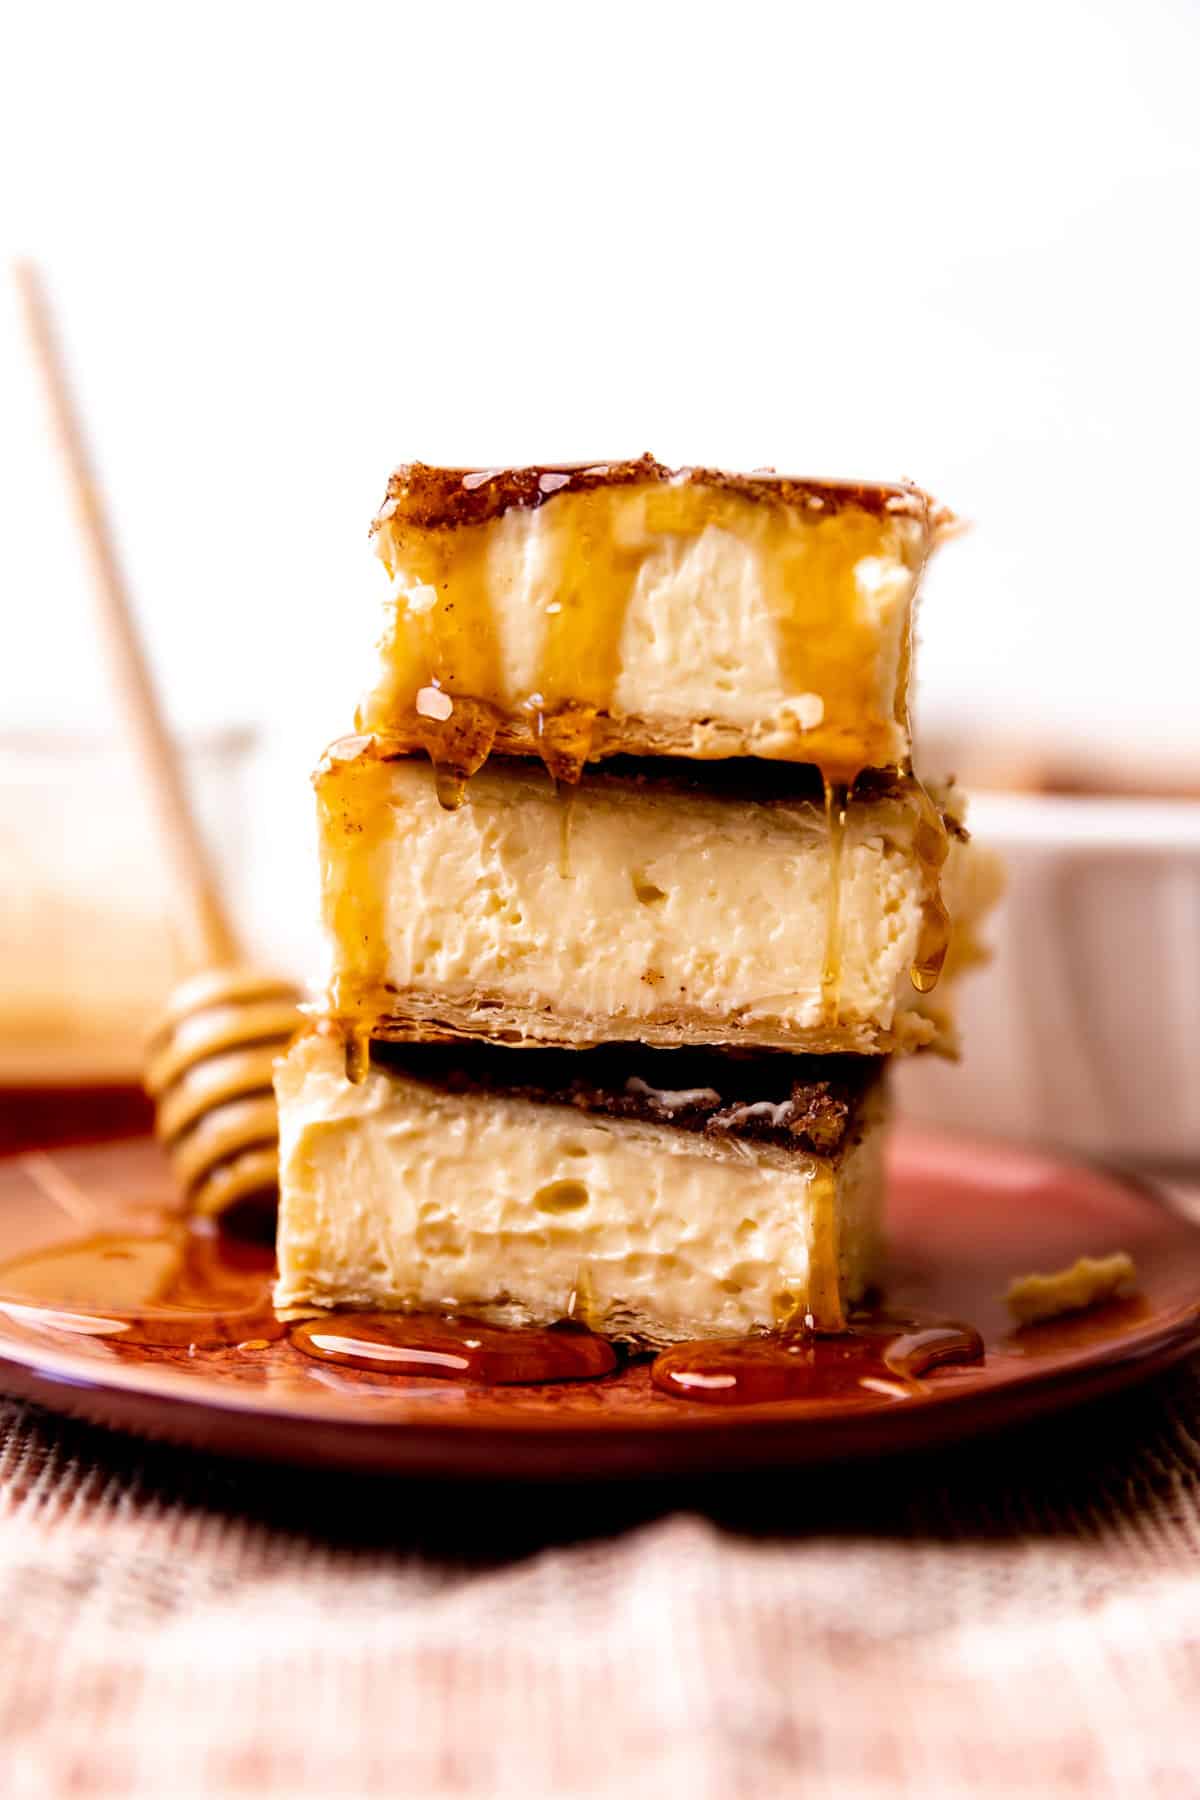
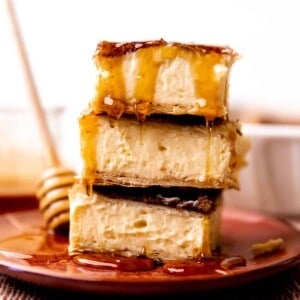
These easy to make Sopapilla Cheesecake bars are inspired by the fluffy Mexican fried dough sopapillas. A thick layer of sweet cream cheese filling between layers of flaky dough all topped with a sprinkling of cinnamon sugar and a drizzle of butter for a crunchy, sweet crust. It’s a mash up of sopapillas, churros and cheesecake all in one decadent dessert bar!
Why we love these Sopapilla Cheesecake Bars:
This recipe is a fun, easy mash up of sopapillas, cheesecake and churros. It’s impossible to go to any potluck or party in Texas and not find these Mexican Cheesecake dessert bars being served. Some reasons why we love these bars so much:
- Texture: smooth and creamy cheesecake is sandwiched between two layers of flaky puff pastry. The top is baked with a drizzle of butter giving us a crunchy cinnamon sugar crust.
- Flavor: the classic flavors of cinnamon sugar, paired with dough and the sweet tang of cheesecake.
- Easy to make: these bars come together quick and easy and are made large to feed a crowd! Making these perfect for get togethers and potlucks!
Ingredients
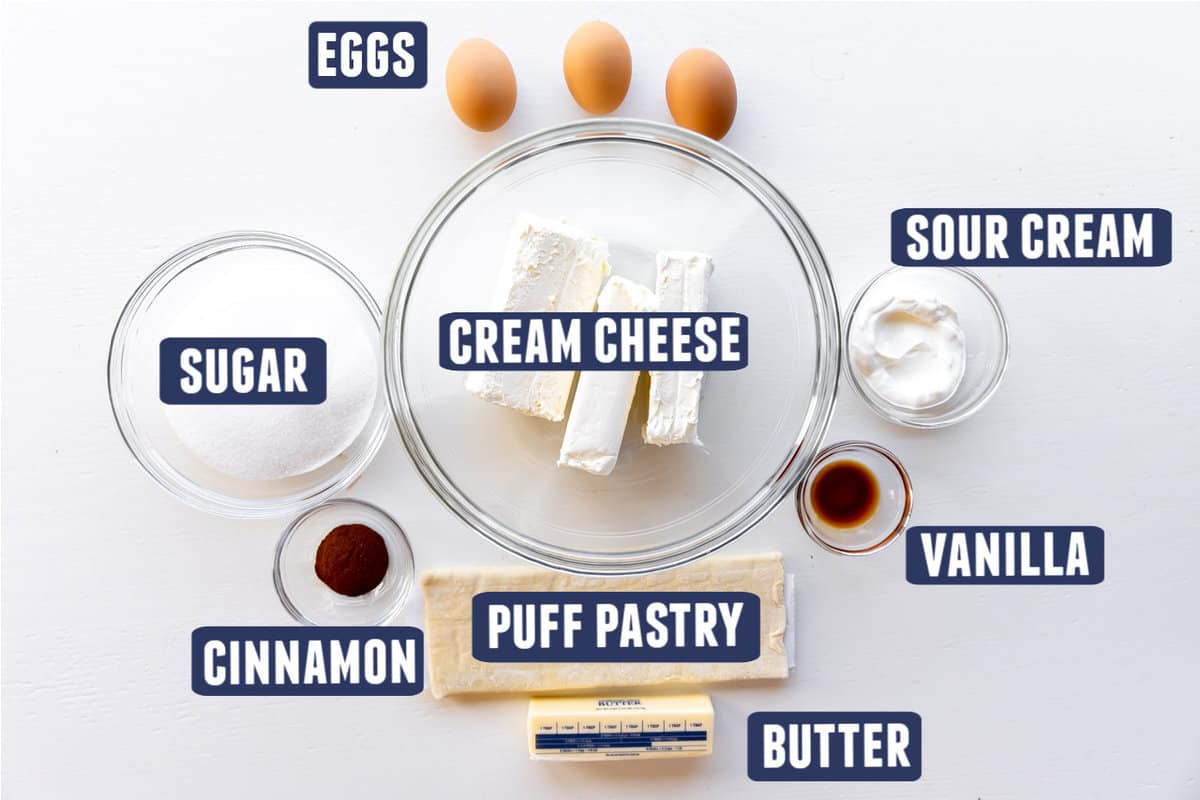
Notes on some ingredients:
- Cream Cheese: use a full fat cream cheese for this recipe.
- Puff Pastry: gives a wonderful flaky crust. This can be substituted for Crescent Roll dough also.
- Eggs: helps create a smooth and creamy cheesecake layer.
- Sour Cream: gives a nice balance to the sweetness of the cheesecake and helps make it extra creamy.
How to make:
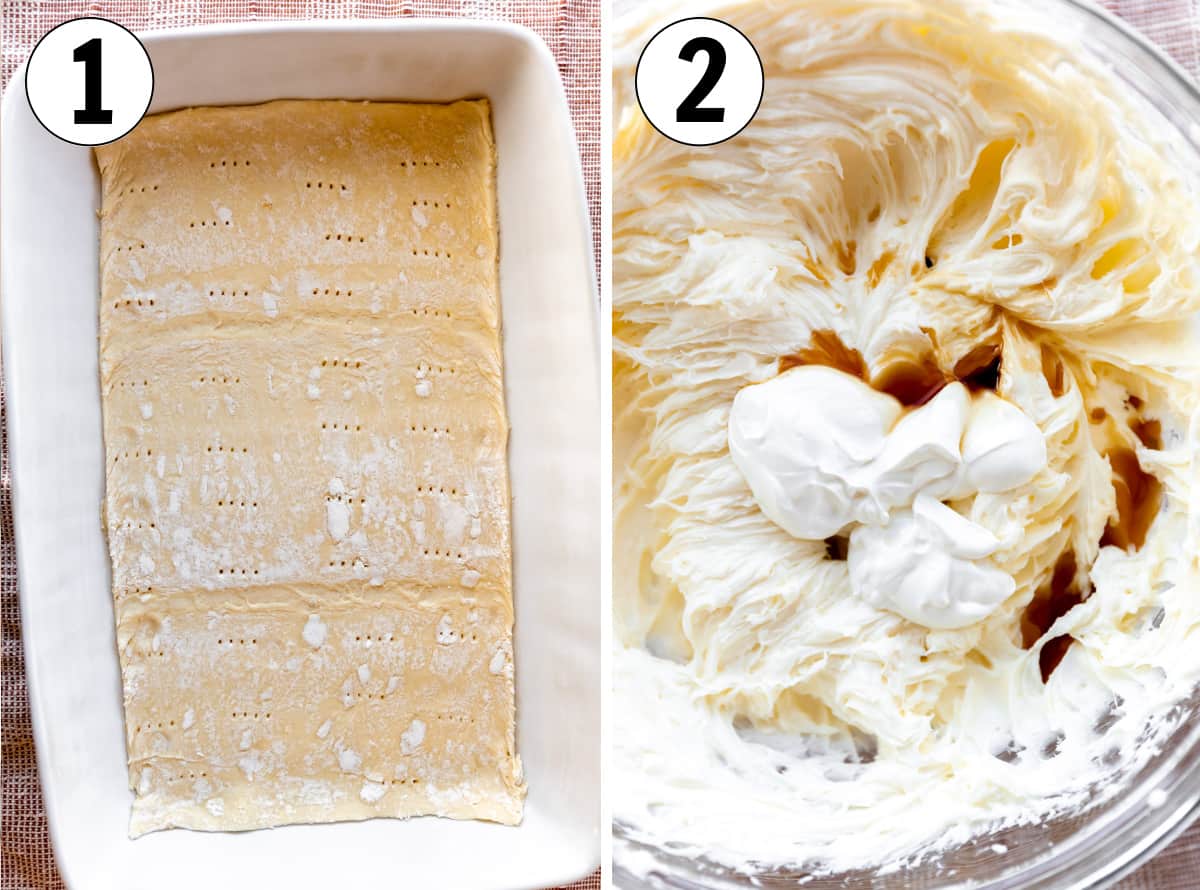
- Prepare the bottom crust by rolling out the puff pastry to a 9×13 size, then place in a prepared baking pan. Poke holes into the dough with a fork before baking. This prevents large bubbles to form during the baking process.
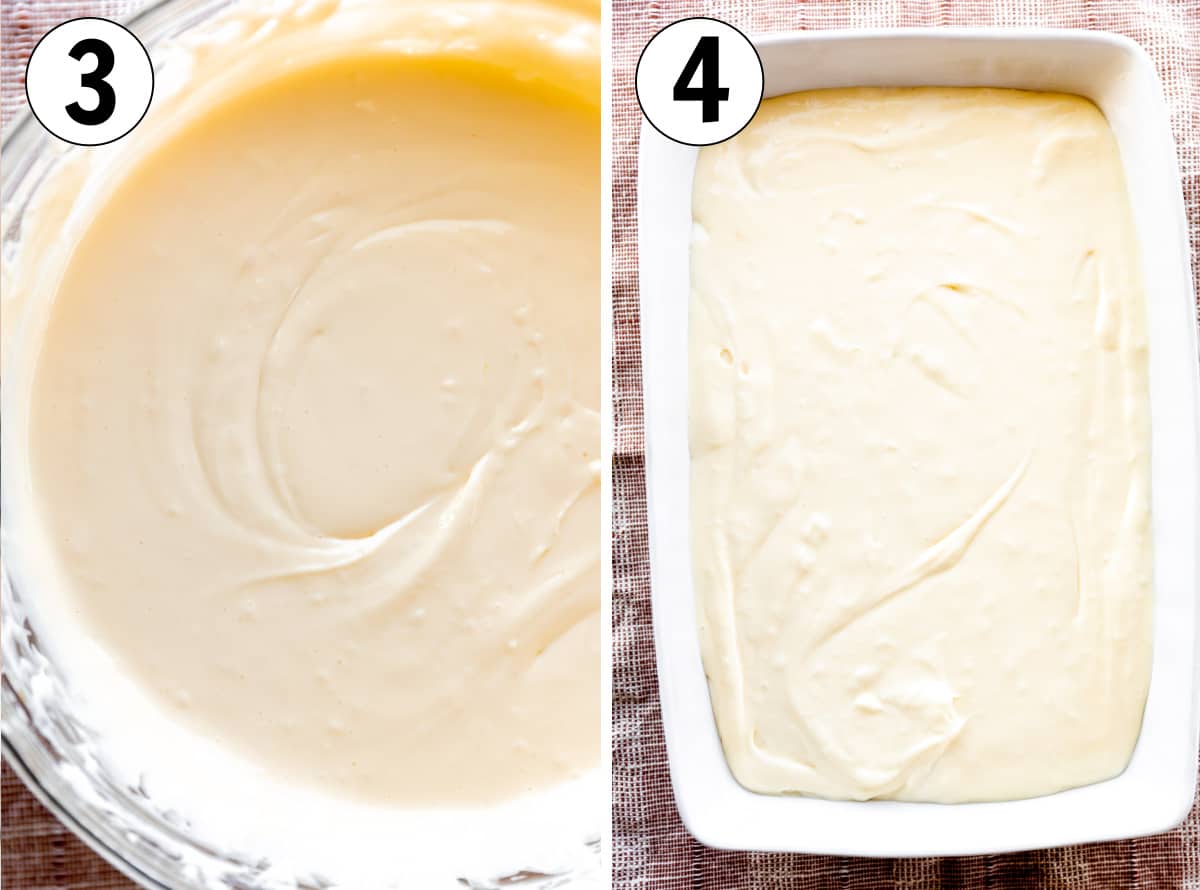
- Mix together the cheesecake layer using a hand or stand mixer.
- Beat until batter is smooth and creamy.
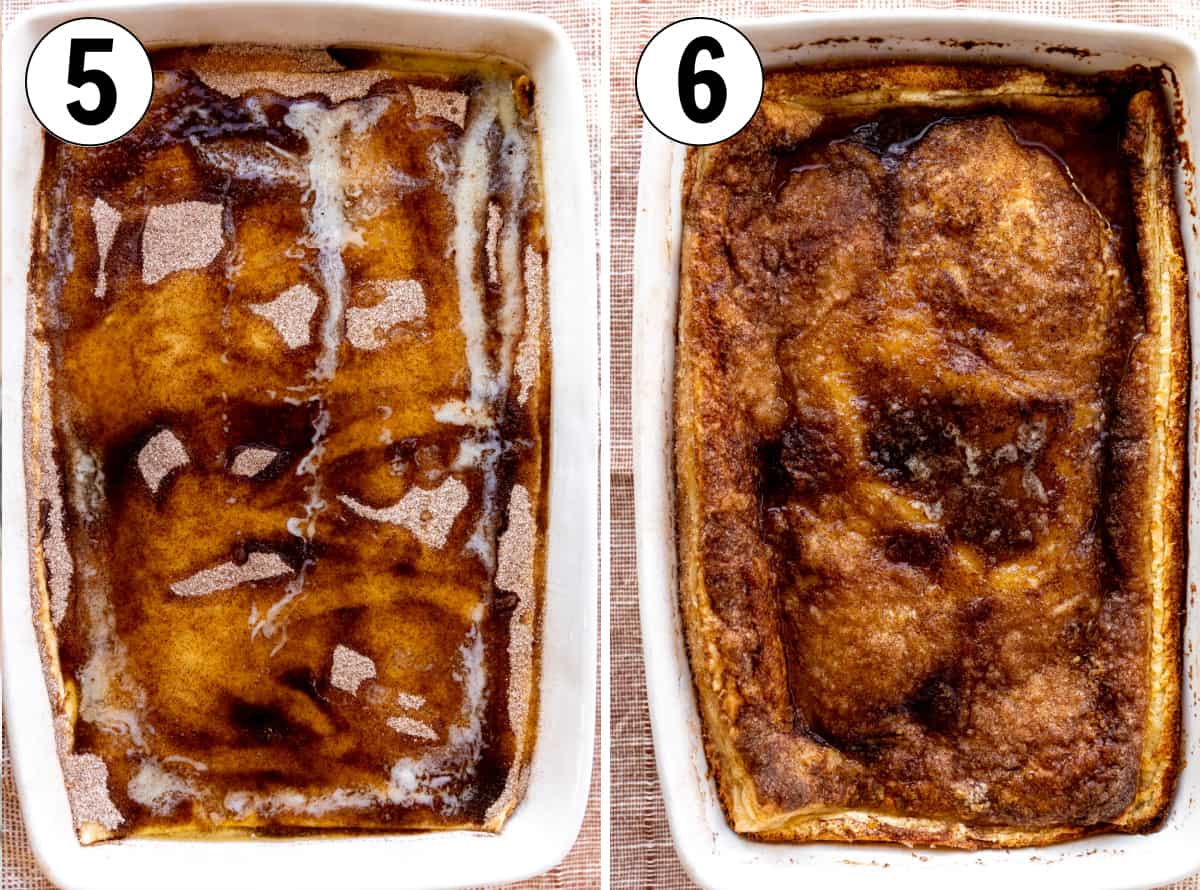
- Spread the cheesecake batter over the baked bottom crust.
- Place the top crust over the cheesecake layer, then sprinkle with cinnamon sugar and drizzle with melted butter.
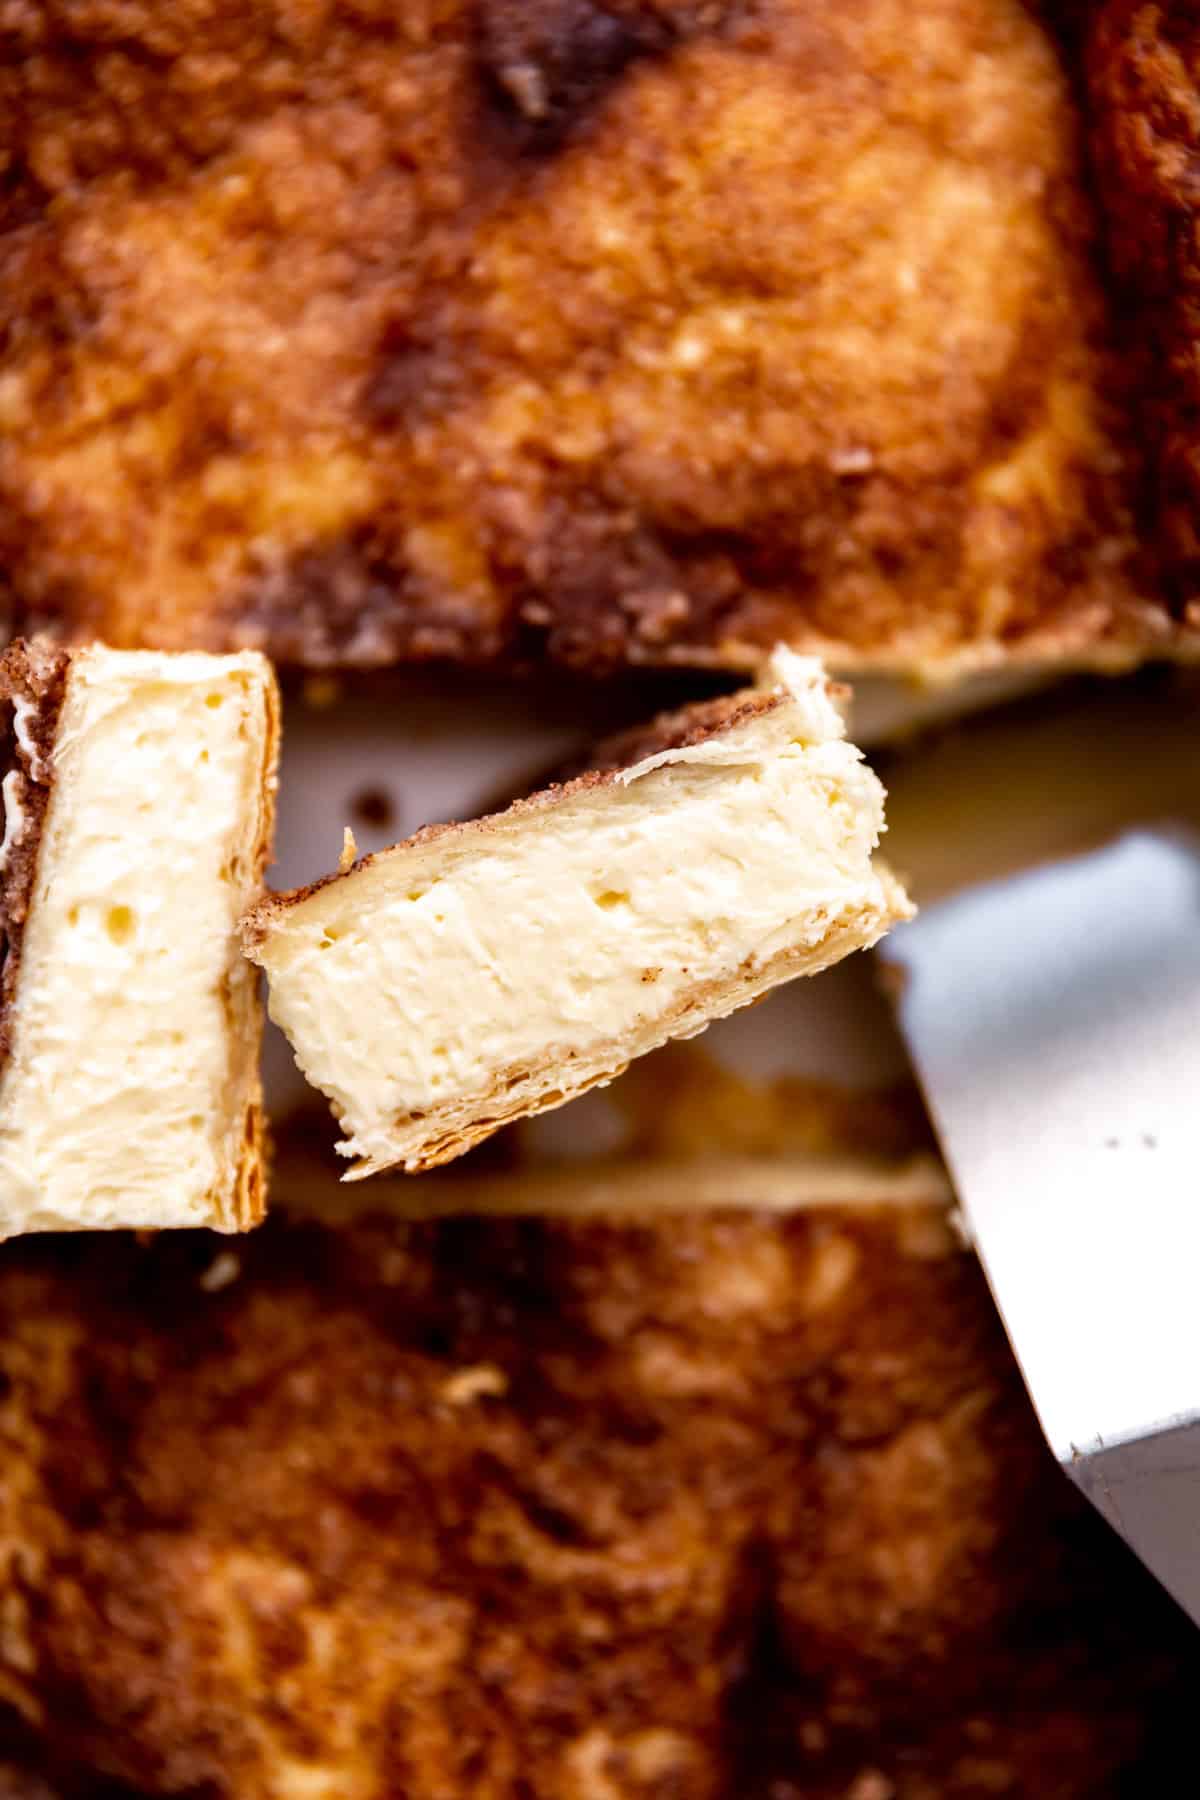
- Bake for 40 minutes. The top crust will be golden and puffy. Don’t worry if you see pools of butter on top due to portions of the crust puffing up. These will harden into a lovely cinnamon sugar crust on top as the cheesecake bars cool.
Storage Instructions:
- Leftovers: Store the bars in the refrigerator after allowing to cool to room temperature. They will be easier to slice when cooled and can be served cold directly from the refrigerator.
- Freezer: these bars can be frozen in a freezer safe container for up to 2 months. Remove to the refrigerator to defrost and thaw overnight.
Serving Suggestions:
- Traditional way with a drizzle of honey.
- Drizzle of chocolate fudge sauce.
- Drizzle with caramel sauce or dulce de leche.
- Top with whipped cream.
- Serve with fresh berries on the top or side.
- Drizzle with a fruit sauce (like this Homemade Strawberry Sauce).

Variations:
- Crescent Roll Dough: if you would prefer to use crescent roll dough you can swap that for the puff pastry used in this recipe. Sheets of dough or perforatted rolls of dough are sold in most markets, either would work for this recipe.
- Fruit Swirls: Add some pie filling or fruit sauce to the cheesecake layer and swirl it around for a fun, fruity dessert option.
- Halved Recipe: Easily cut this recipe in half and bake in an 8×8 baking pan to make a smaller amount for your family.
- Individual Rolls: These Sopapilla Cheesecake Rolls are a fun and easy dessert recipe the family will love! Individual crescent rolls baked with a cheesecake filling.
Sopapilla Cheesecake: FAQs
Sopapillas are fried quick breads, in Tex Mex cuisine they are small fried pieces of dough that puff up like pillows which are then coated in cinnamon sugar and drizzled with honey. They are served as a dessert at the end of a meal (here’s my recipe for traditional Tex Mex Sopapillas).
Yes, these cheesecake bars can be frozen. Once baked, allow to cool to room temperature. Slice and place in a freezer safe container. Store in the freezer for up to 2 months. To thaw, remove to the refrigerator and let defrost overnight.
Sources place New Mexico as the area of origination for this particular recipe. It’s most commonly served in New Mexico and Tex Mex restaurants. Mexico has a similar recipe to sopapillas, which is the Bunuelos, another version of fried flour tortillas with a cinnamon sugar topping.
More Cinnamon Dessert Recipes:
Watch How To Make
Sopapilla Cheesecake Recipe
Ingredients
Cinnamon Sugar
- ⅓ cup sugar
- 1 tablespoon ground cinnamon
- pinch sea salt
- 6 tablespoons unsalted butter melted
Instructions
- Preheat the oven to 350 degrees F.
- Spray a 9×13 baking pan with cooking spray (or grease with butter or oil) and set aside.
- Sprinkle a small amount of flour on a clean working surface and roll out both sheets of puff pastry to just over 9×13 size. Lay one sheet into the prepared baking pan, and set the other sheet aside.
- Poke the pastry in the baking pan with a fork all over.
- Bake the puff pastry for 15 minutes then remove from the oven and allow to cool for 5 minutes. The pastry will deflate as it cools.
- During baking time, prepare the cheesecake layer. In a large mixing bowl beat the cream cheese and sugar with a hand mixer or paddle attachment of a stand mixer, until smooth and creamy, about 2 minutes.
- Add in the sour cream, vanilla extract and salt. Mix until fully combined.
- Add in the eggs one at a time, mixing until just combined. Be careful not to over-mix once the eggs are added in.
- Pour the cheesecake mixture over the top of the baked and cooled puff pastry. Spread even on the top with a silicone spatula or offset spatula.
- Lay the remaining layer of puff pastry on top.
- Brush the top with about 2 tablespoons of the melted butter.
- Stir the cinnamon and sugar topping ingredients together in a small bowl. Sprinkle over the top of the pastry.
- Drizzle the remaining melted butter on top.
- Bake for 40 minutes or until top is puffed and golden. It’s possible the pastry puffed and butter has pooled in spots, don’t worry, the pastry will deflate as it cools and the butter will spread and create a nice cinnamon sugar crust on the top.
- Remove and allow to cool to room temperature. Store bars in the refrigerator. They slice nicely when cooled completely. Best when made the day before.
- Serve with a drizzle of honey if desired.
Video
Nutrition
Nutrition information is automatically calculated, so should only be used as an approximation.
Photography by the talented @KJandCompany.co

Love this recipe! So easy to make and it’s delicious! I made mine with scharr gluten free pastry puffs and vegan cream cheese and sourcream. The substitutions worked.
My whole family loved it!
a new dish for me, thank you, cream cheese and puff pastry is always a great place to start, so thank you!