This post may contain affiliate links. Please read our disclosure policy.
Tender and juicy turkey, perfect for Thanksgiving day. Plus instructions on how to make turkey stock, gravy and stuffing too!

Bear with me today. This is a long post with a lot of information. So grab a latte and let’s talk turkey!
Deconstructing the Thanksgiving Turkey has meaning and purpose. Trust me. Or, I guess in this case, trust Julia Child.
Have you ever been to Thanksgiving and taken a bite of the turkey and thought, WOW that is some tender, juicy turkey! Probably not. Neither have I! Dark and light meats need to cook to different temperatures. Did you know that? So what happens when we cook the turkey all together is that we are essentially drying out the meat.
Julia, the genius that she is, came up with the idea (I really don’t know if she was the first person ever..but she’s the one who came up in all my searches) to take the turkey apart so that we can solve that problem.
I’m going to be honest with you here. If you can..please buy your turkey fresh from a market and take it to the butcher to have them do this for you.
If you can’t and you want to give it a go yourself (which I HAD to!! Apparently there’s no fresh turkeys weeks before Thanksgiving…) watch this video here. It’s Julia and Jacques Cooking at Home and it will show you how to do this on your own.
Some important things to know when you buy your turkey:
- Buying fresh, not frozen. You can take this to the butcher and have them deconstruct it for you. You will be asking them to remove the thighs from the breast. Then to remove the thigh bones from the thighs and to remove the backbone from the breast. Save all the bones since you will be using this to make turkey stock for gravy.
- Buying frozen.
- Already brined. Some turkeys, like most Butterball, will come already brined. You will see on the label that the ingredients include the turkey and a solution of water, salt, and spices. These turkeys you will just need to defrost and deconstruct. You will not need to brine them.
- Not brined. If you purchase an organic or all natural turkey you will need to brine the turkey. This is basically soaking the turkey breast in a salt solution after it’s deconstructed. This helps to keep the meat juicy and tender during the baking process.
Now you have your turkey. If you have a frozen one then you will need to defrost it. How long?
Allow 24 hours for every for 4 lbs of turkey.
The best way to defrost a turkey is to place it in the refrigerator over a period of several days. If needed you can place the turkey in a sink full of water which will speed up the process, but it’s going to monopolize your sink for a long time. If you are able to, just stick it in the fridge.
This year I started with an 8 lb turkey so I let it defrost for 2 days in the fridge. Which meant that I put it in the fridge on a Monday morning.
Turkey Timeline:
- Sunday/Monday- depending on size of your turkey you will need to place it in the fridge to start defrosting. REMEMBER: 24 hours for every 4 lbs of frozen turkey.
- Wednesday- Deconstruct the turkey and place in brine. (Note:if you are using a pre-brined turkey you can skip this step and just store the breast covered in the fridge)
- Thursday- cook the turkey and enjoy!!
Turkey Deconstruction Tips & Tricks:
- Make sure the turkey is FULLY defrosted. Deconstructing while there is still ice on the bird will be challenging, not to mention a piece of ice may cut your hand..(yes..I’m serious!)
- Put some muscle into it. You won’t hurt the bird. Trust me. And it takes a slight bit of force to pop the bones out.
- Save all the pieces! We will be using them to make the gravy.

How to deconstruct the turkey:
- Start with the thighs. If you pull the thigh out away from the breast you will see that it’s just attached by a thin layer of skin, easily sliced through. Then cut along the thigh, getting as much dark meat as possible. Watch the video from above (here it is again) and you can watch how Julia and Jacques took theirs apart. You will need to pop the thigh bone out and cut the meat around it to separate the thigh completely.
- Remove the thigh bones. Using a knife cut along the bone to the joint, once there you will find a place that it is easy to cut through, it’s a joint that is just cartilage, not bone, so the knife goes through easily and you can pull the thigh bone out.
- Remove the back bone from the breast. Easiest to cut out using sharp kitchen shears and then just grab it and pull. Be careful, bones will snap and they can be sharp!
What can we make with this turkey?
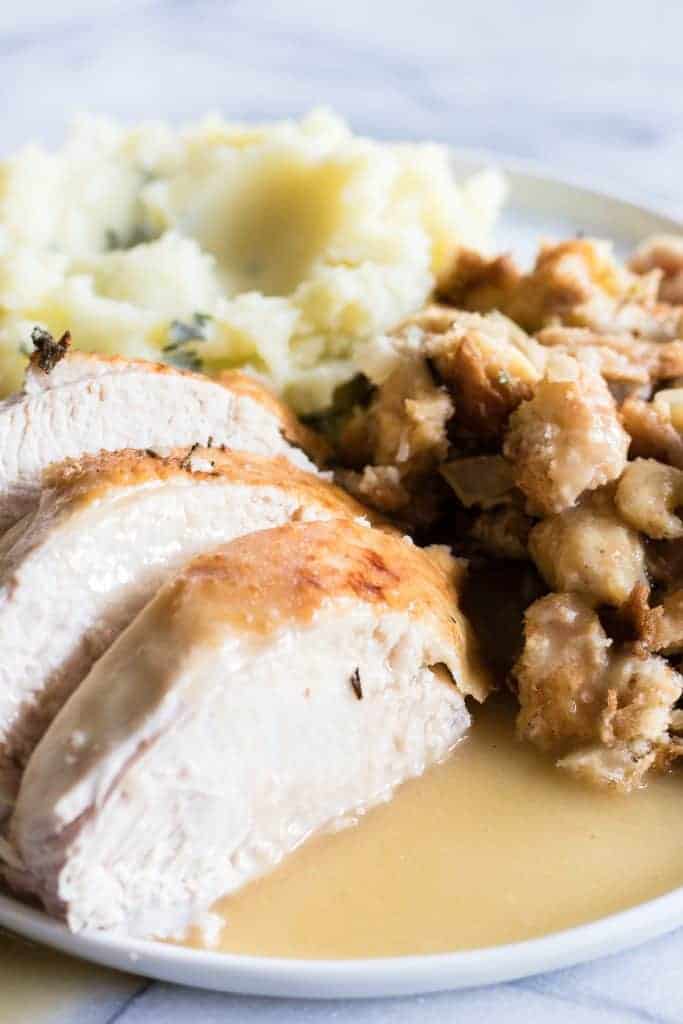
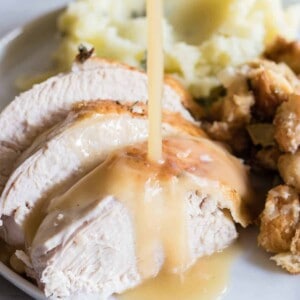
- Turkey meat. Duh. We will end up with the turkey breast and thighs.
- Turkey stock and gravy. Made from the bones and scraps.
- Stuffing. This will cook under our bird in the oven and absorb all the juice released from baking.
Now..are we ready for the recipe??
Yes!! You can do it!
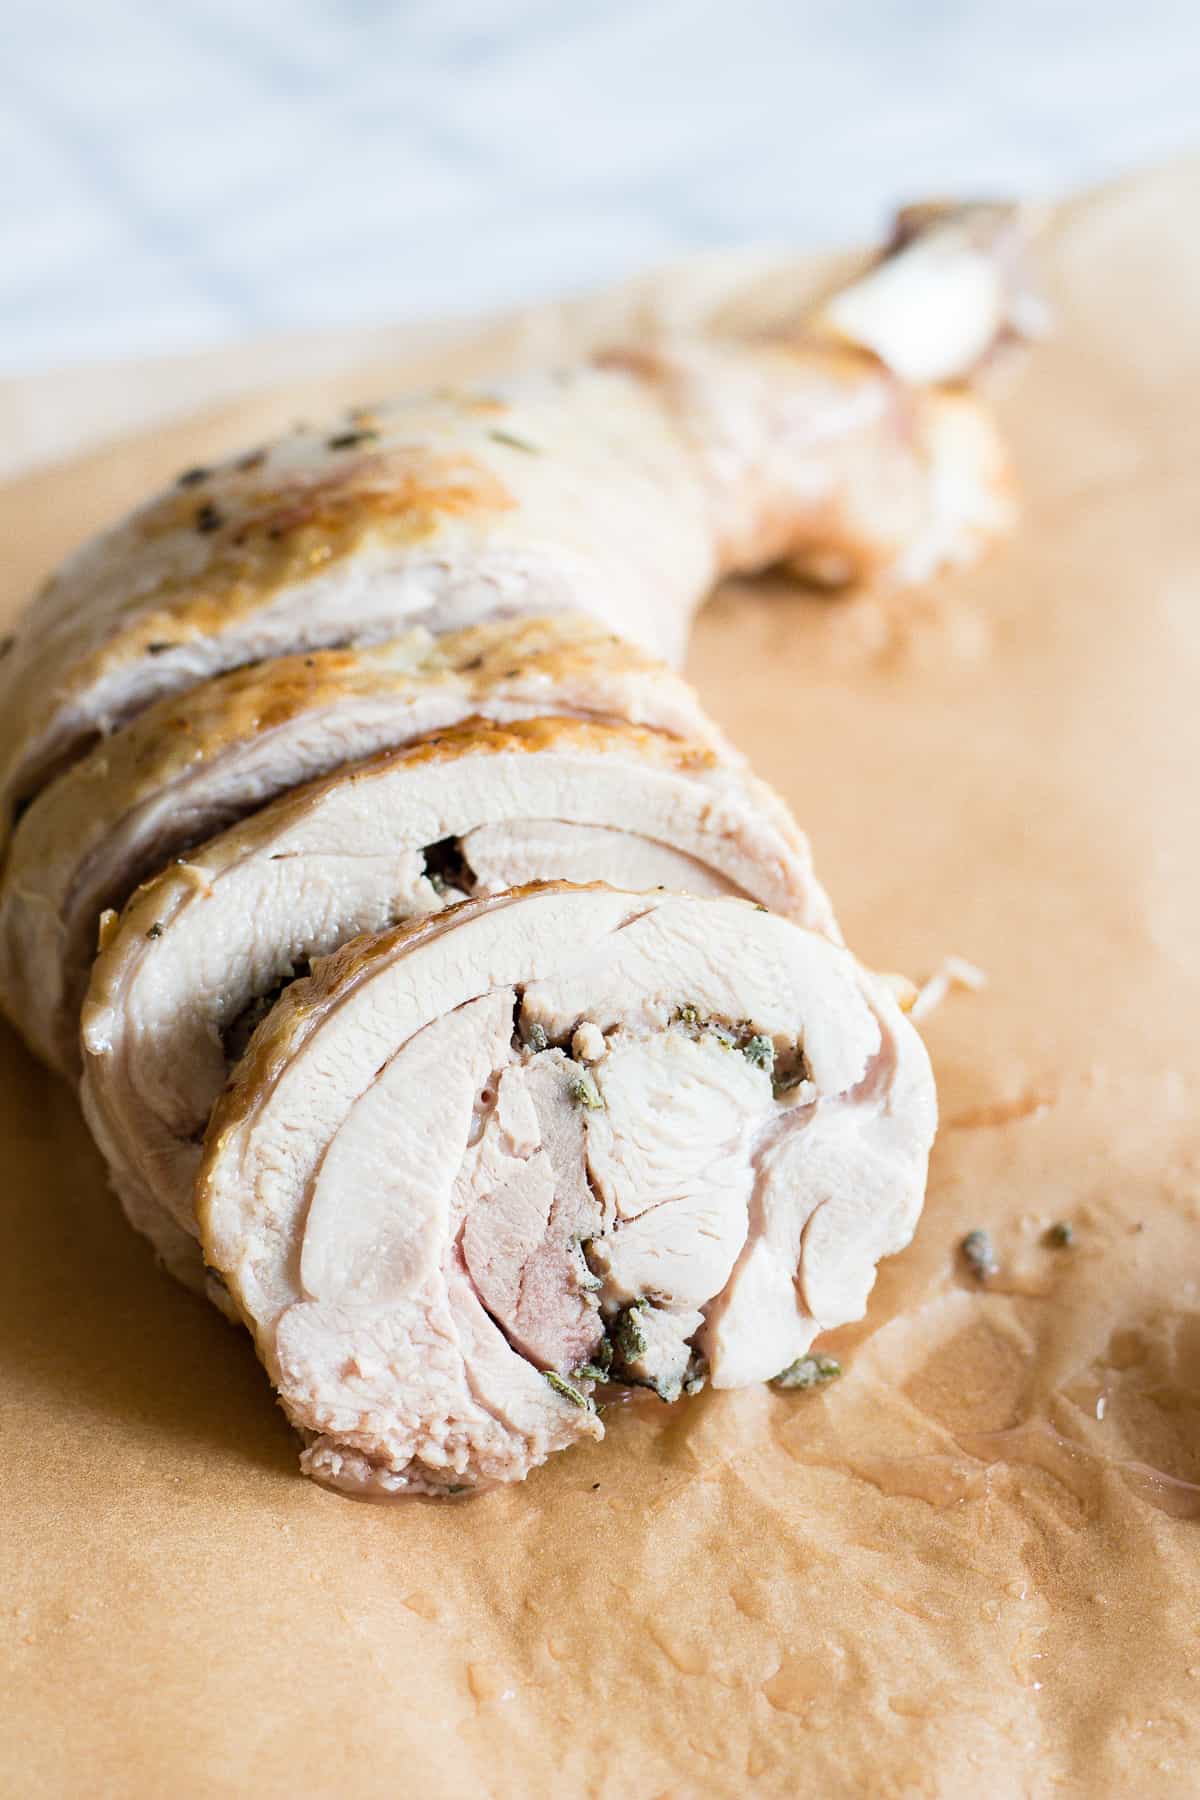
Just look at how nicely the dark meat slices with that thigh bone being removed. Not to mention the sprinkling of sage in the middle of all that meat. Swoon!
Julia Child's Deconstructed Thanksgiving Turkey
Ingredients
- 10-12 pound turkey
For Turkey Thighs:
- 1 tsp salt
- ½ tsp ground black pepper
- 1 tsp chopped sage
Brine Solution:
- 12 cups water
- ½ cup salt
Garlic Herb Butter for Turkey:
- ¼ cup butter softened to room temperature
- 2 cloves garlic minced
- 1 tsp rosemary chopped
- 1 tsp thyme chopped
- 1 tsp sage chopped
- 1 tsp parsley chopped
- zest of 1 small lemon
Turkey Stock:
- 1 tbsp olive oil
- Bones removed from the turkey plus any other scraps
- 4 cups chicken broth low sodium
- 3 stalks celery chopped
- 2 carrots peeled and chopped
- 1 onion diced
- 1 stem rosemary with leaves
- 3 stems thyme with leaves
- ¼ cup parsley
- salt and pepper to taste
Turkey Gravy
- Prepared Turkey Stock
- 2 tbsp butter
- 2 tbsp all purpose flour
- salt and pepper to taste
Stuffing:
- 1 loaf white sandwich bread
- ½ cup yellow onion diced
- 2 cloves garlic minced
- 2 tbsp butter
- 2 tsp fresh rosemary chopped
- 2 tsp fresh thyme chopped
- 1 tsp sage chopped
- 4 large eggs beaten
Instructions
Deconstruct the Turkey:
- Using a sharp knife, cut through the skin around each thigh where it attaches to breast. Push the leg forward to pop the bone out of the socket. Cut through joint to separate leg quarter.
- With your knife, cut along the sides of each thigh bone to separate it from the meat, then slide knife under bone to free it. Cut around the end of the bone where it connects, and find the soft cartilage connecting the bones and slice through to remove the thigh bone completely.
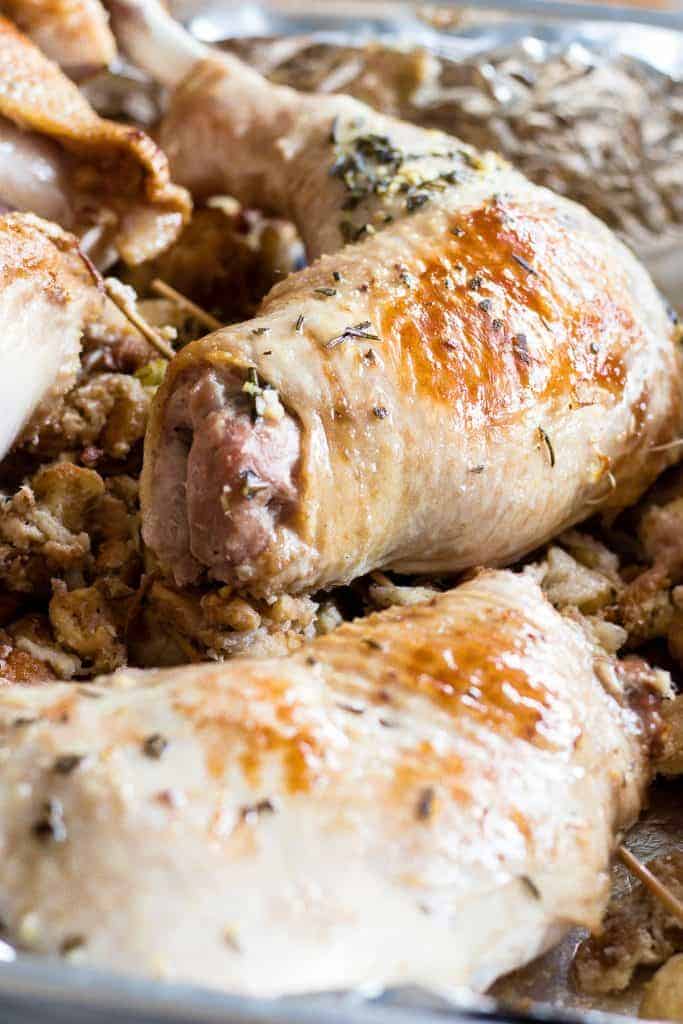
- Sprinkle the inside of each thigh with salt, pepper, and chopped sage. Close the thigh back up by using two wooden skewers and then tying it closed with kitchen twine. Place the thighs on a plate or in a dish and cover with plastic wrap. Store in the fridge for 6-12 hours while rest of turkey brines.
- Using sharp kitchen shears, cut through ribs along the side of the backbone.
- Using your hands bend the backbone away from the breast to pop the shoulder joint out of socket. Then cut through the joint (the soft cartilage) to separate back from breast.
- Prepare the brining solution. Pour into a large pot or container that will fit the turkey and will fit inside your fridge. Brine the turkey breast for 6-12 hours.
Cooking the Turkey and Stuffing:
- Preheat the oven to 300°F. Slice the bread into small square cubes. Spread the bread out in a single layer on a large baking sheet lined with foil or a silicone baking sheet. Bake for about 30 minutes or until the bread is dried and crunchy. Remove from the oven, allow to cool for several minutes and then pour bread into a large bowl.
- In a large skillet over medium heat melt the butter, add the onion and allow it to cook for about 3 minutes until soft and translucent. Add in the garlic and cook for an additional 30 seconds until fragrant. Pour this mixture over the dried bread.
- Remove the turkey breast from the fridge. Pat dry with paper towels. Prepare the garlic herb butter by mixing all of the ingredients together in a small bowl. Use half of the butter on the turkey breast, rubbing into the skin.
- Preheat the oven to 425°F. Heat a large oven safe skillet over medium high heat. Once heated place the turkey breast in the skillet skin side down. Sear the skin for about 2 minutes then move the skillet to the oven and continue baking at 425°F for 30 minutes.
- While the turkey is baking, beat the eggs and mix into the stuffing mixture. Pour the stuffing into a large roasting pan. Once the turkey is done baking for 30 minutes remove from the oven, carefully use two towels to protect your hands and transfer the turkey breast into the roasting pan breast side up on top of the stuffing. Add the turkey thighs to the roasting pan on top of the stuffing as well. Coat the thighs with the remaining garlic herb butter. Take the time to ensure all the stuffing is under the turkey to keep it from cooking too much.
- Reduce the heat in the oven to 350°F. Bake the turkey and stuffing for an additional 50-75 minutes, to where when you place a meat thermometer in the breast the temperature is at least 160-165. The thighs should be at 175 to 180.
- Remove from the oven and allow the turkey to rest for about 20 minutes prior to cutting.
- Stir the stuffing to mix with the juices from the turkey.
Prepare the Turkey Stock and Gravy: (can be done at any time after deconstructing the turkey)
- In a large pot over medium heat add 1 tablespoon of olive oil. Add in the turkey neck and bones. Allow to sear in the oil for several minutes. Then pour in the chicken stock and add the celery, onion, carrots, and herbs. Bring to a boil. Allow this to simmer for about 30-45 minutes. Pour through a fine mesh strainer and collect the liquid in a bowl. Discard the scraps and herbs.
- Allow the stock to sit and cool for about 20 minutes, this will allow the fat to separate and gather at the top so that you can skim it off with a spoon.
- To make the gravy, heat a medium size pot over medium heat. Add in the butter and cook until melted. Stir in the flour and allow to cook for 2-3 minutes until the flour is browned. Pour in the turkey stock. Bring to a simmer and allow to simmer for about 5-7 minutes until the gravy is thickened.
Nutrition
Nutrition information is automatically calculated, so should only be used as an approximation.

Just wondering… I understand I need to be at 165 for the breasts, and 175 for the thighs/legs… what’s the trick for making them come out at the same time at these different temps?
This turned out fantastically!! Just made this on Sunday as we had our Thanksgiving late. Everybody absolutely raved about it. My father, who’s 74 year old and not real forthcoming on compliments, told me prior to leaving that he thinks that’s the best turkey he’s had ever!! I may actually make this again for Christmas. I may get rid of the wings too and put them in the stock. I’m not a wing fan and it seems they might be put to better use making stock. They do make good handles for transporting the breast from baking pan to serving dish. Thanks so much for providing this recipe….it’s a HIT!!!
has anyone tried stovetop cornbread stuffing with this?
This is the best turkey recipie. Cooking time is cut way down. The dark meat is tasty. Instead of cooking in the oven side down. I cook mine side down on the bbq/smoker before putting the turkey in the oven at 350 over the stuffing, but I like to bbq. Thank you for the detailed recipie.
Thanks Dereck! So glad you enjoy this recipe, it really makes a great turkey! I love that you used the smoker. I’m going to have to try that!
What would I do differently for a 20 pound turkey?
Since the recipe is written for a 10-12 pound turkey, you will want to double the other ingredients, to ensure you have enough herbs, butter, etc. The bake time will also increase, I don’t have an exact time to give you, but it will take a bit longer than the recipe states. Keep an eye on it and check the temperature to ensure that the turkey makes it to 165 internal temperature to be safe for eating!
Thank you. I too am a fan of Julia. I will definitely try this in November. You were very kind to share this recipe. Happy (future thanksgiving!)
I made this recipea few years ago. One of the best turkeys and sstuffing I’ve ever had. The only reason I’ve not madeit again, someone else cooked the Thanksgiving meal.